Kodak ColorPlus 200
Since I purchased my Pentax MX I've been using it a lot!! The Kodak ColorPlus 200 was the second film I tried. (If I don't count the b&w film I didn't set correctly in the camera and found out after 36 clicks that the film wasn't winding). The Kodak ColorPlus 200 has a different tone from the Fuji Superia 400, it's warmer and has more contrast. I think this would work great on a sunny autumn day shooting foliage. It is also very affordable. Will definitely purchase again!
ABOUT Kodak ColorPlus 200
- C-41 colour negative film (developed quickly by most developing companies)
- 24 exposures
- 200 ISO
- Wide Exposure Latitude
- Fine grain
- Price: £3 (here)

Ceahlau Massif panoramas


This autumn I took on the challenge to climb the Ceahlau Massif with my camera gear and reach the top, the Toaca Peak at 1904m.
The view from the top was impressive any direction and the best way to bring a little bit of it back was to compose these wide panoramas.
My gear for the following images was: Nikon D7100 with a 35mm lens and a tripod. The weather was unbelievingly good for the time of the year and you could see for miles. The best spot for the sunset was behind Dochia Cabin, near the little church. There were no clouds and no contrasts but the orange hue was just as impressive over the layers and layers of Carpathian Mountains
.Being at the top meant seeing both the sunset and the sunrise and nothing can compare with the view from above on a clear crisp morning from the room balcony. From a photographer point of view the sunrise is where I felt the need for a ND gradual filter but lacked one. The sky was getting brighter and brighter but the night shadows were still covering the trees and rocks beneath. I decided to go for a more underexposed setup and fix it in post processing (Lightroom CC).
The following day was just as clear and going through the juniper we followed the path to the top of the Ceahlau Massif where even more breathtaking views were waiting. I think this part of the trip was my favourite as no matter where you look there was amazing blue skies and incredible forests, lakes and hills. The path to the top was being rebuilt and part of the group stayed behind while a few of us braved through rocky paths and steep, slippery terrain to see beyond the peak. From the top, on the other side of the mountain we could see the Bicaz lake and some of the villages, looking very small from that hight. The trip was a real adventure especially on the way back and I'm planning on a second post with more pictures of the beautiful views and some stories from along the way.

Editing fairy lights portraits

fairy-lights-before-after

fairy-lights-before-after

glasses-before-after
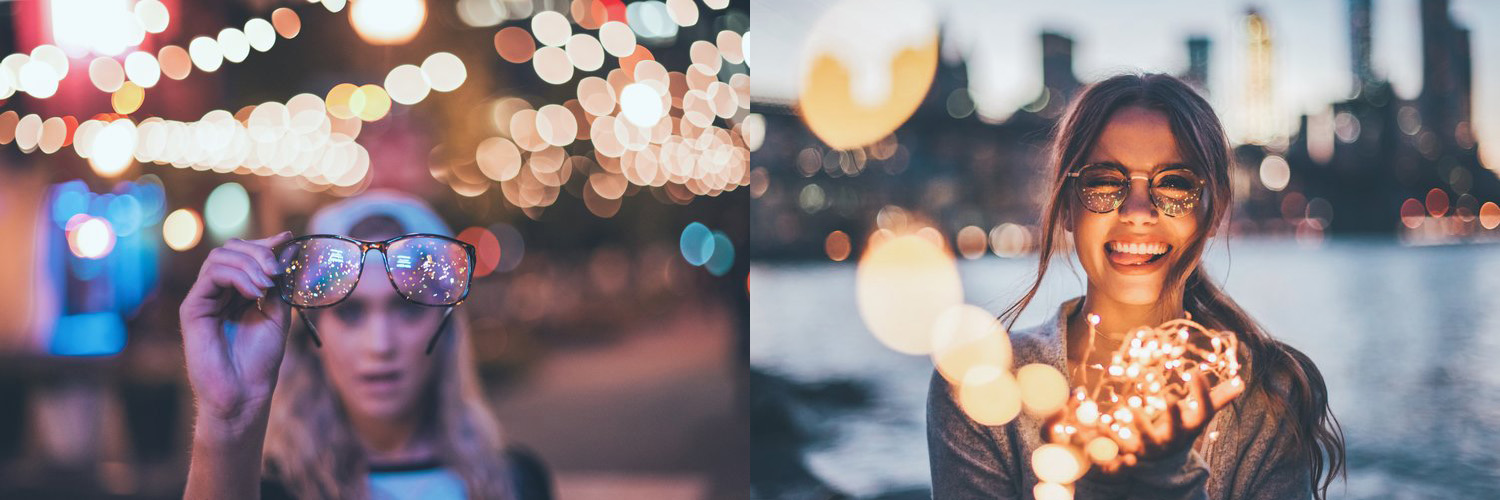
A quick example of fairy lights photography, a la Brandon Woelfel and the editing from underexposed image to something portfolio worthy.
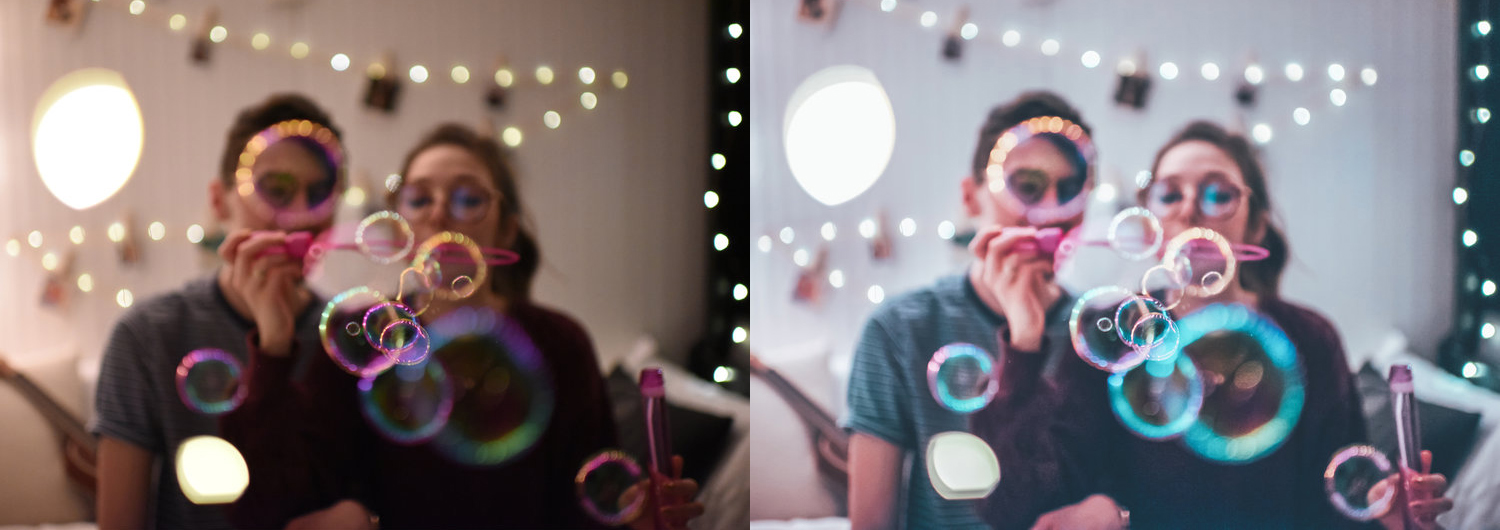
I shot these with a friend in her room. I already have a blog post about Brandon Woelfel photography where I'm deconstructing his style and this is an example of results using some of those tips. :)
As props we had a mirror, a wardrobe with reflective doors, a couple of fairy lights and the models glasses. The star shaped fairy lights I used I found in Primark but there are many options on Amazon also. I recommend micro fairy lights. The model was sitting with her back at the reflective wardrobe door. The lights behind her are from a few string lights that were hanging on a free standing mirror in front of her. I used my Nikon D7100 and my 35mm 1.8 lens.
The bokeh effect is due to the wide aperture. In the image above you can actually see the mirror behind her. I like how the glasses reflect the lights she is holding.
I also tried using a prism to create a blurred effect as it can be seen bellow.
The images were edited in Lightroom to increase the exposure and brighten up the shadows. Saturation was also increased and I played with the colours for shadows and highlights to bring more of the blue and pink tones.

prism-before-after
Fujifilm Superia X-tra 400
I tested my new 35mm camera, Pentax MX with the Fujifilm Superia X-tra 400 film this week. This was my first experience using a film SLR and was nervous about two things: Would the camera work properly? Would shooting film be worth it?The answer to both questions ended up being: Yessss!!!
About Fujifilm Superia 400 X-Tra
- C-41 colour negative film (developed quickly by most developing companies)
- 36 exposures
- 400 ISO
- Fine-grain images
- Beautiful grain and colour rendition

Delicious bruschetta recipe

Bruschetta recipe
This is a simple bruschetta recipe I made on a lazy Saturday morning for brunch with what I had in my fridge. I was in a photo mood so I just took a few snaps and put the recipe together. I hope you will enjoy it too.
Bruschetta Ingredients
2 slices of bread
15-20 cherry tomatoes (they are usually tastier than normal ones)
2-3 medium mushrooms
1-2 garlic cloves (you can skip this if you don't like garlic)
1 tbsp olive oil
1 pinch of pepper
1 pinch of salt
a bit of cheese (I used feta cheese because it's all I had but cheddar or mozzarella would be great too)

Bruschetta recipe tomatoes
Steps
Toast the two bread slices
Cut the mushrooms into small slices and bake them for 5 min in an oven heat up to 180. (keep the oven on for the end)
Cut tomatoes in 5mm cubes and put them on top of the toast.
Then add the salt, pepper and oil.
Top up with garlic, the baked mushrooms and finish with the cheese to cover all the ingredients.
At the end just pop it in the oven for 5 min or just enough for the cheese to melt.

ingredients_animation

Bruschetta
I ate this all on my own but you can share if you'd like! Quick and easy :)Enjoy ...

How I chose my first film SLR
I'm a digital photographer. It's easy to shoot, once, twice, check later, tweak the exposure, shoot again. But I was always fascinated by film photography, nothing compares to the colours and the grain of a 35mm print. So a couple of months ago I went on a search for my first film SLR.We're talking about vintage cameras ok? So like 50-60 years old! Older than me cameras! Buying second hand was the only choice really and this works best if you're patient and do the research.
First film SLR: The Budget

vintage cameras
I went to the website I thought had the best chances on: Ebay. After looking at prices for vintage SLRs, I decided on £70 as the maximum budget.I already have two vintage cameras which I got really cheap (£10) but film SLR cameras are a bit more pricey. In the same time, I know myself, and I know I can get bored quite easily so I couldn't invest too much and get a newer model.
First film SLR: The Research

Ebay research on Ipad
I think I knew the style even before I knew the budget. I knew the look I liked, and there seem to be a large pool of cameras to choose from. There were many brands on offer from that period and each brand had many other versions. This was getting complicated .. the sleepless nights begun. (Did I tell you I hate too many choices?! I'm so indecisive!)There were a few things I went through to make sure I'm taking the best decision.
Talking to friends
My friend was Google, I asked it a lot of questions: Best film camera? Best budget film camera? 35mm SLR cameras? etc etc etc. I also asked some people I know ;) they recommended a 35mm first: "Disregard the medium format cameras until you are serious about film as they are more expensive".
Reading forums and reviews
After making a list of brands and versions I started to look more in depth into it by searching for samples images (Flickr is a great resource for this). Here's a list of my favourite articles on the subject:Camera guide from Curating Cuteness (she also has a great film guide with samples images)I still shoot film (what a great resource of articles!)Japan Camer Hunter From a long list of brands and versions such as: Nikon, Canon(I must admit my strong loyalty to Nikon didn't let me look at these much), Olympus, Minolta, Pentax, Nikkormat. I ended up with just a few that still tempted me: Minolta (SR-T, XD11/7 or X-700 series), Pentax (K1000 or MX), Olympus (OM1), Nikon (Fm2n).
Asking people online
After reading all I could read online I decided to post my own question on a Flickr group and a Facebook group. My list was shorter and shorter and my heart was in between Pentax and Minolta. I needed help to finally decide. I must admit the answers there weren't different to what I've seen during my days of research .. but it was more for reassurance that I'm going in the right direction.
First film SLR: The Conclusion
Tips I gathered along the way:
Get the camera brand you own as you might be able to use the same lenses

Nikon flatlay
Great advice ..but in my case my Nikon camera is a cropped sensor and you can only use full frame lenses on 35mm film cameras. Also the vintage Nikon bodies have a different lens mount to the current ones.
Make sure you get a bright viewfinder (there is no screen on the back)
Make sure the batteries used for the light meter are still readily available in shops. Some vintage cameras use mercury batteries that are more tricky to find.
Get a camera that is working even without batteries especially if these are difficult to get hold of or replace.
Go for a prime lens, preferably from the same manufacturer. This was something I decided from my own experience with digital cameras. Wide aperture prime lenses offer a sharper image and faster shutter speeds.
Try to get a metal body instead of a plastic one - they tend to last longer.
Be patient and persistent, you can find new listings every day and you will find the perfect camera for you. I waited for a long time to find mine while searching each day: Minolta XD11/7 or Pentax MX on Ebay.

Pentax MX
I know £70 sounds like nothing compared to the prices of the DSLRs these days, but these cameras are build to last and take great pictures, plus I can bet my children will inherit it and it will be just as good.I present to you my new baby: The Pentax MX (just arrived and can't wait to test it!*)*Review in a future post

Details of The Ethnographic Park - Cluj Napoca


During my last stay in Cluj I visited the National Ethnographic Park.
This time I looked beyond the old buildings representing Romanian architectural history. I mostly focused on the little details. Like this little piece of a bee hive ..looking like part of the furniture.

I was also fascinated by the round shapes in the leafless trees that offered an interesting horizon and background for the old buildings. The so called chocolate box houses with the thatched roof have a different feel here, with their shabby, cracked look - they have real character.

The church towers are impressive and you can see the importance of christianity in the details and workmanship. Most of the households and farms still kept the workshops and tools used for working the land.
My favourite thing was to look inside, through the window, at the old traditional decor. It reminded me of the crackling fire and the holidays spent with my grandparents.

I recommend taking a stroll through the Ethnographic Park on a summer day to experience the rural feel of old Romanian villages and the smell of fresh cut grass and old wood.

Deconstructing photography styles: Brandon Woelfel
I am starting this series with a photographer that is very appreciated on Instagram. He built his name using an individual style that appeals to many, and especially to the young generation: Brandon WoelfelI really like it too: the colours, the fairy lights, the bokeh, the dreamy feel, the sleepy messy look, the glasses.In the search for your own style I advise to look to others, test, practice, repeat, get inspired and then move forward with at least one lesson learned. Experimenting with different techniques is what can get you closer to finding your own voice.So let's see what analysing Brandon's images says about how he's creating cohesive and brilliant content, and how we can learn to portray a similar feel.
Low light

Brandon Woelfel low light
To obtain a complementary style to Brandon's you need to shoot in low light. Don't remove light completely as the props might not be enough to illuminate the model. Try shooting at dawn or dusk or on a moderately lighten street.The way you ca deal with the low light is:
up the ISO - which means there will be some grain in the final image. No worries! noise is part of his style. You also need a camera that can handle a high ISO.
lower the aperture number - which actually helps with the bokeh. To achieve this a prime lens would be the best choice. (For example a 50mm 1.4 or 1.8)
Props

Brandon Woelfel props
If you look at most of the images Brandon Woelfel has on his feed there is a clear predilection towards objects that either reflect or create light. Take some props to your shoot: mirrors, glasses, something sparkly, water, fire, glitter, a prism, bubbles.Beside these there is a certain vibe his photos are portraying: stylish, hip, cool, urban, young, fun. All this using certain modern elements such as: polaroids, hats/caps, large frames, cool colours, graphic Tees, jeans - for getting a collage look.Wear the props or use them in front of the lens or as a play item, there are no rules. His images are about having fun with friends in a cosy/friendly environment.
Bokeh
Brandon Woelfel bokeh
I believe Brandon Woelfel is the best example of how to use and do bokeh. Those blurry lights in the background, and in the foreground, and all around, look beautiful. Besides taking the photos in low light and using the props you also need a small aperture number. Brandon's foreground and background have a nice bokeh which means he focuses on the subject(which could be either a person or and object) with a 1.4 - 2.8 aperture. Make absolutely sure you have lights in the shot (street lights, city lights, fairy lights) somewhere behind the model. Also if you have fairy lights you can hold some in front of the model, closer to the camera to create that big light blobs. Using a large aperture not only helps with the foreground blur but works well if it's only an arm length from the focused subject!
Post processing
Brandon Woelfel post processing
Like with most low light, underexposed images you need to allow some time for post processing. Sometimes the colours are changed to offer variation. The main palette remains similar and cohesive with muted blacks, cool whites, bright highlights and increased saturation on a number of colours. In his images the whites tend to have a blue tint and the enhanced tones are: turquoise, aqua, pink, blue, azure. Some of the fairy lights and bokeh can be multiplied in photoshop using cloning and Brandon Woelfel doesn't make a secret of it. He shares some of the before and after images on his Instagram stories and also on his website. This is helpful as you can have a feel of what the image should look like before the editing process and how much it they can change using the right tools.
His style is inspiring, yes! but don't get caught up in it for too long as it will slow you down from finding your own...Good luck

Cluj-Napoca streets and architecture

birds in Cluj Napoca

21 December 1989 Boulevard

Mihai Viteazu Market

Cluj Napoca Intersection
Since I moved away from Romania, visiting is always nostalgic, but now, as a tourist I seem to notice the beauty of its buildings and architecture more. This April I took my 35 mm lens and shot some images of Cluj-Napoca streets.
I have to describe the style as eclectic. It's a mish mash of old and new from different decades, cultures and architectural styles.

Graffiti on Cluj Napoca Streets
The streets can use some renovation and some paint ... but the wall "art" and the cables and wires above the wide streets are part of the city and difficult to avoid.
Walking through the centre of the city is not hard to find beautiful architecture in the Renaissance and Baroque styles. Just look above the streets and shops to discover the windows and walls of an old city that was an important cultural centre.It's interesting that you can only see the beauty of a place after you have others to compare it with.

Cluj Napoca Architecture
By traveling to different countries and cities I can see little parts of my home in them and vice-versa. And Cluj-Napoca is definitely an European city that holds a lot of history: the Saxon background and the Austrian domination leaving a footprint in the style of the buildings.Curious to see what other articles I can find about beautiful Cluj I stumbled over a couple of posts that might give you a different point of view on this beautiful city that will always be close to my heart:

King Ferdinand Street

Family portrait sessions

Happy family
Family portrait sessions are a new venture for me but one that I have been interested in getting into for a while. Compared to the portrait and couple photoshoots they are more exciting, funny and even a little bit chaotic.Here are some of the lessons I had to learn when it comes to outdoor family portraits.
What's your name?

brother and sister
This might not be as important but if you are like me, you might want to ask the names of everyone and memorise them before the shoot. This way it would be easier to prompt different people and get everyone to be involved when needed. I must admit I am not great at remembering names when I first meet someone.
Location, location, location

dad and kids
Make sure you check the photoshoot location beforehand. Think about lighting and shadows and what would be best to set as background. Think of the poses and where would they go better. Make a list in your mind (or on paper/phone) and don't forget to have ideas for both an overcast day and a bright sunny day! I can't stress enough how important it is to know where the shoot will take place. When there are children involved is best to be prepared in all the areas you can. And don't forget they like to run around so keep safety in mind!
Timing is everything

Brothers
When I want to talk about timing I don't mean being punctual: you should be there before anyway! I am referring to choosing the right hour for the shoot! The right time of the day can depend on weather, sun light, clouds, season and even events.Makes sure the light is not too harsh - it's not easy to always find the right tree or building to shoot under and direct sunlight may cause unflattering shadows in portraits.If you already know the location (which you should) check if there are any events going on or construction sites open when you are shooting - we don't want people staring or ruining the background.If it's not an overcast day, and sun is shining bright then think about the famous Golden Hour (right before the sunset) or shoot from a lower angle so the sun is behind the people and expose for shadows. (and don't forget a lens hood)
Focus on what is important

the family
When there are many people around and you are switching between shooting kids with dad and then kids with mum and so on, focus on what's in front of the camera. It's easy to get distracted by the cute child running behind you while you are shooting the parents, but it's best to notice the lens flare or the bin at the right of the frame, or that the camera didn't focus the first time.I recommend using the Continuous Shooting Mode to get at least one shoot with everyone's eyes open. And use a higher aperture than the 1.8-2.8 of a standard portrait session :)